Thursday, October 17, 2013

Review: XCOM: Enemy Unknown

Why can't we work things out? Little people, why can't we all just get along?
-- President Dale, Mars Attacks
 
 
Okay, okay. I know I'm way overdue writing a review for XCOM: Enemy Unknown.  But give me a break!  There's been too many great games to play and not enough time.  That, and throw New York Comic Con into the mix and, well...enough said.  Anyway, enough excuses.
 
XCOM: Enemy Unknown is a turn-based, action-strategy game that makes you the commander of XCOM, an elite paramilitary organization charged with defeating an unknown alien threat.  In order to accomplish this daunting task, you must organize your XCOM base, manage strategic assets across the globe, train soldiers, execute missions, develop alien technologies, and numerous other activities that come with the territory--you know, saving the world and all that.
 
After a long period of playing primarily first-person shooters and point-and-click adventures, I found XCOM's strategic and turn-based action components to be a refreshing change.  At the XCOM base (in between missions), there are a wide range of things to do: recruiting new soldiers; researching different technology to improve armor, weapons, and aircraft; building new facilities to expand your base; and managing satellites and country relations throughout the world to combat the alien threat.  When you get tired of doing activities around the base, you can deploy your team to Earth to complete missions involving civilian rescue or alien threat "neutralization."  The balance between strategy and action, coupled with an underlying sense of urgency and easy flow of gameplay, makes XCOM quite addictive.

Soldier customization screen prior to starting a mission.
Photo courtesy of gamereuphoria.com
The most fun part of the game was controlling the XCOM team on the ground during missions, allowing you to use unit-level tactics to defeat the aliens and save civilians.  The turn-based action takes your soldiers through alien-ravaged city streets, warehouse districts and alien spacecraft to achieve the mission.  Your team includes five soldiers which start out as Rookies but can achieve up to the rank of Colonel once they gain enough mission experience and kills in battle.  Each soldier receives a specialty designation: assault, sniper, support, heavy, and eventually psionic (a special alien-derived skill set).  You can also customize each solider--not just their gear, but their names and appearance as well--and rotate out soldiers to ensure the best combination of skills for a particular mission.  But unlike some other games, a soldier's death in XCOM is permanent, which can have a significant impact on your team and mission outcome, depending on that soldier's rank and skill set.  You can always recruit more, but a high-ranking soldier takes time to develop. 
 
Example of a mission mode scene during battle.
Photo courtesy of gamedynamo.com
While the turn-based action was my favorite part of XCOM, it is also the part with the most deficiencies.  The scenery and mission layouts could get repetitive, particularly later in the game, but in general the gameplay was engaging enough to distract from the deja-vu effect.  What wasn't easy to ignore were the recurring issues with navigating soldiers through multi-level buildings and executing attacks.  While I applaud Firaxis Games' efforts at developing what must be a fairly complex combination of maps and player actions to make the gameplay as smooth as possible, there were undeniable issues with transitions between levels of buildings and changing viewing perspectives to evaluate enemy locations and attack options.  In addition, there were numerous glitches where enemies and even soldiers' gear randomly disappeared in the middle of missions, and then randomly reappeared (not as part of the alien powers!), which is just annoying.  And lastly: hit percentages.  Every soldier has a percent change of hitting their intended target prior to shooting, which is displayed at the bottom of the screen.  This is to allow the player to make a determination if shooting from that location is effective.  There were way too many times that the hit percentage was listed as 80-90% and my soldiers would miss their intended target.  Way more than even random chance would account for.  I can do math, and this math didn't make sense.
 
 
Situation Room screen.
Photo courtesy of giantbomb.com
Back at the XCOM base, most of the gameplay is straight forward: toggling between your lab, engineering, command and control, and your barracks to manage various aspects of your alien-fighting operation.  The only issue I had with this part of the game was that I had to rely on retrieval of supplies and artifacts from missions in order to be able to build new things.  There's an option in the Situation Room, called the Gray Market, where your team can sell artifacts and supplies that are no longer needed.  If we are able to sell items to other countries, why can't we buy them as well?  A lack of certain resources often precluded me from building certain new technologies, thereby delaying the overall forward movement of game.  I am sure that this limitation is intended to auto-regulate the game tempo, but I would have preferred to have the flexibility to procure some items through the Gray Market and accelerate the readiness of my team for the more challenging missions later in the game.
 
Overall, the balance between turn-based action and global strategy makes XCOM appealing and addictive.  However, I can't give it a resounding two thumbs' up because of the drawbacks in the mission mode that ultimately made me impatient and annoyed toward the end of the game.  But I still had to finish it to save the world and avoid alien domination.  I'll be interested to see what the future of the XCOM franchise holds.
 

Wednesday, September 11, 2013

Borderlands on a Budget: Part 2 of the Budget Cosplay Series


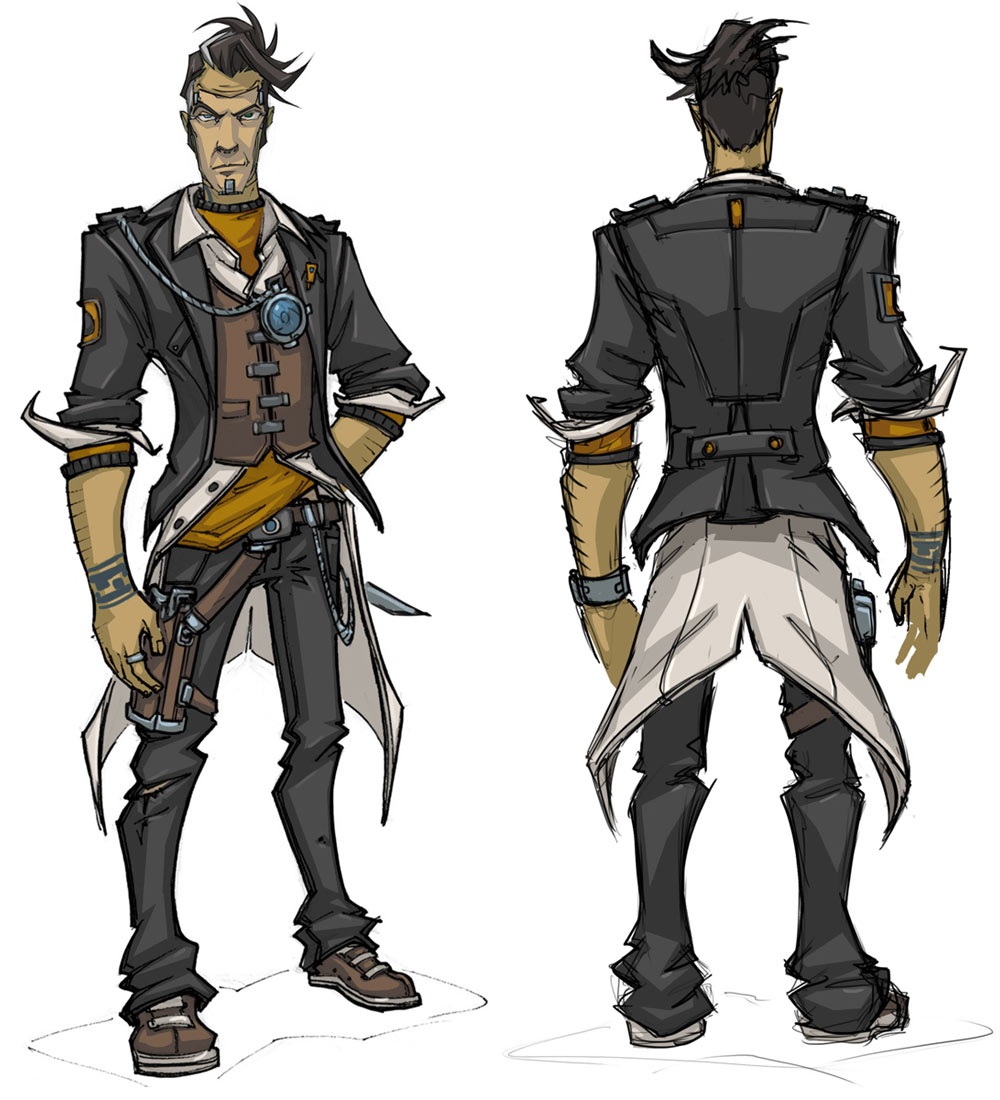
Full-length view of Handsome Jack
My blog post from this past April, Bioshock on a Budget, focused on assembling a cosplay for under $50.  The article was so well-received that I recently decided to do a follow-on project.  This time I chose Handsome Jack, a character from one of my other favorite games, Borderlands. I thought this cosplay would be a great fit for my husband to accompany my Mad Moxxi cosplay, in anticipation of Baltimore Comic Con last weekend.  And, looking at the elements of Handsome Jack's outfit, I thought it would be realistic for me to put together the cosplay for under $50.  Was I successful?  Read on to find out!


This close-up screen shot of Handsome Jack shows the facial
detail and several of the accessories I would need to
construct to make an accurate cosplay.
For those unfamiliar with the character Handsome Jack from Borderlands, he's the bad guy.  In fact, he's the biggest jerk in all of Pandora.  That being said, his look is pretty awesome and distinctive enough to make a great cosplay.  It also has a lot of elements that I thought I could realistically find at the thrift store and modify for the cosplay--much like my Elizabeth and Booker cosplays from Bioshock Infinite.  The main structural elements of Handsome Jack's outfit are a gray blazer, white collared shirt, orange crew-neck shirt, and dark pants with sneakers.  But you can see from the photos that there's a lot of small accessories, including the digital "mask" pieces on his artificial face.  So really, the devil is in the details on this one, and I spent a majority of my time working on those details to make a convincing cosplay. 
 
Knowing that the accessories would be the biggest time sink, I started with those. Most supplies I needed came from the local crafts store (Michael's) and items were primarily constructed of foam board or balsa wood. Both materials are fairly easy to work with (scissors for foam, exacto knife for balsa wood) so you don't need a ton a crafty skills to do this.

This is the wood facing  glued on the face of a 
standard silver belt buckle. The wood was later
painted silver.

The start of the belt buckle, a
2x3 flat wood piece with details made from
fancy construction paper and some
fabric-coated wire.
First I made the belt buckle and Jack's aqua-colored light array on his lapel.  I used a 2x3" flat wood piece from Michaels (sold as a set of 5 for $1.99) and glued it onto a standard silver belt buckle.  for the front details, I cut a small circle out of some sparkly aqua-colored paper and glued it to the wood.  I used a small piece of fabric-covered wire around the edge of the paper to give it a more finished look. 
 
For Jack's lapel light array, I used balsa wood.  I traced a hexagonal shape onto the wood, and carved it out using an Exacto knife.  Then I just used some regular sand paper to smooth out the edges.  Later, this wood shape was painted with silver acrylic paint and the circular center was painted with an aqua-colored paint.  I added in the line details with a slightly darker color paint. 

The start of the light array on Handsome
Jack's lapel, carved out of balsa wood with
an Exacto knife. I traced the shape outline
on the wood with pencil before cutting,
then sanded down the edges after cutting.
 
Next, I focused on creating the digital facial attachments, necklace, bracelets, vest buckles.  I went to Amazon and was lucky enough to find inexpensive options for the bracelets (two for $6) which were black, but I painted the exterior with silver paint.  I bought the plastic buckles from Michael's for $2.99, and painted them each a slightly different color using a combination of brown, orange, silver and aqua acrylic paints (each $0.99 at craft store).  


The foam board pieces that would
eventually be used as Jack's digital
facial pieces.  I painted them with
silver paint and added acqua paint
for accents to give it a more digital
look, and used dark grey to add
details that mimicked metal hinges
and screws.

 For the facial attachments to create the basis of Jack's "mask," I cut out foam board pieces, glued them together and painted to resemble small electronic components.  These are lightweight enough to be attached to the cosplayer's face using eyelash adhesive.

Here's what the necklace looked
like once buttons were strung
and painted.
Jack's necklace was a bit tricky as I needed to inexpensively construct something with square, metallic-looking pieces, but could not find any right-shaped beads or jewelry at the craft store. I ended up buying a cheap bag of nean-colored square buttons, and painting them dark gray/silver. I then used some plastic stretch cord to connect the buttons.  It wasn't the sturdiest construction ever, but it got the job done!


Next, I did a few little detail items for Jack's blazer: a patch on the right sleeve (which you can see in the screen shot above) and some other electronic component pieces for the shoulder boards on the blazer.  I just used bright orange paint on a scrap piece of brown fabric from another project, and later sewed the patch on the blazer. For the shoulder boards, I crafted the electronic component pieces the same way I made the previously mentioned facial "mask" pieces...silver and aqua paint on foam board.

Miscellaneous accessory components in varying stages of completion (clockwise
from bottom left): Neon buttons used for necklace; balsa wood aqua light array on lapel;
electronic components for blazer and facial attachments; plastic buckles for vest; arm cuffs;
and decorative arm patch for blazer (center).


Here's the brown leather vest (already
in our wardrobe) with plastic buckles attached to
buttons using clear stretch cord, pictured left.

And finally: the actual clothing. I found a gray suit jacket at the thrift store for $8.99.  As cost-saving measures, I decided to just use jeans for the pants  and a pair of existent brown loafers for the shoes.  We were lucky to have a brown vest already in our wardrobe (see my comments at bottom about work-arounds for this).  I also found an orange tee at the thrift store, and some white sheet fabric to make the shirt tail that extends below Jack's blazer.  Both of those cost a total of $5.50.  I had some leftover gray fabric from another project which I used to make a couple embellishment straps on the blazer, and used some of those leftover orange buttons from the craft store to decorate the straps.  I made the shirt tail as an attachable piece for the back of the blazer.
The finished shirt tail,
made of a white sheet
bought at thrift store.
 
Now I have to admit that since I did my Bioshock on a Budget blog entry in April, I have learned to sew...not well, but good enough to follow some basic patterns and modify pre-made clothing.  So for Jack's white shirt tail, I cut a whale tail shaped piece of fabric, finished the edges with the sewing machine, and pinned the fabric to the blazer.  Sounds pretty easy but it took a lot longer than expected...I was sewing like the wind the night before Baltimore Comic Con!
 
So Friday night I put everything together, and Saturday morning was spent doing the facial makeup for Handsome Jack.  I used eyelash adhesive for the electronic components, and some light-tone liquid makeup outlined by a brown eyeliner pencil to create the illusion of a mask.  I also made the eyebrows more pointed using the eye pencil. And there you have it!


Breaking down all the supplies and costs, let's see how we did:
Foam Board     $1.99
Me as Mad Moxxi and Jon as Handsome
Jack at Baltimore Comic Con 2013.
Balsa Wood     $3.99
2x3" flat wooden pieces $1.99
Aqua-colored art paper $1.99
Clear stretch cord $2.99
Bag of plastic buttons $1.99
Craft glue $2.49
Plastic buckles (6) $2.99
Plastic bracelets $6.00
Metal belt buckle $0.99
Acrylic Paints (4 used in this project) $4.00
Gray suit jacket $8.99
White fabric for shirt tail $2.99
Orange tee shirt $2.50
Leather scrap fabric  $5.99
Exacto knife $5.99
 
TOTAL $57.87
 
So not quite under $50, but pretty close! I must mention that many of the items above were actually purchased for previous craft projects (Exacto knife, craft glue, paints, scrap fabric) and really are multiple use items...so technically I could have omitted them from the shopping list and I would have been under the $50 budget.  But one other caveat is that I did NOT include the brown leather vest in my cost totals, because it was in my husband's wardrobe already and I have no idea how much it cost.  That being said, I priced some similar-looking orange-brown fabric at the fabric store which was $4.99/yd, so you could conceivably make something for under $10.  Alternatively, you could get lucky and find a vest at the thrift store. Even if the color is inaccurate, you could paint the vest or pin some right-colored fabric over the front. This would be the least expensive option but could potentially require a bit more time to find and/or craft.
 
I hope you enjoyed this edition of the Budget Cosplay series!  Feel free to comment below if you have questions or feedback.

Saturday, September 7, 2013

Mobile Game Review: Middle Manager of Justice!

Tired of the same old boring office routine at work? Do you want to punch the clock while also punching evil in the face?  Then Double Fine's Middle Manager of Justice might be a great game choice for you!  This iOS/Android game is a bundle of superhero-packed fun, putting you in the manager position at  Justice Corp--perhaps the only office where wearing spandex to work is mandatory.  You're in charge of overseeing professional development, crime fighting, and the general well-being of a band of superheroes that you have recruited.  So really, the fate of your crime-ridden, alien-infested city and its neighboring communities--or even the WORLD--rests in your hands!

I found Middle Manager of Justice to be extremely addictive and entertaining, with clever dialogue and colorful characters--certainly enough to get me through four long flights over the Labor Day weekend.  Your middle manager is initially afforded the opportunity to recruit one superhero for Justice Corp, which gets you through the tutorial phase of the game.  As your new hero fights crime and wins the favor of the surrounding neighborhoods, your Justice Corp branch begins to earn money and superium, the latter allowing you to recruit additional superheroes.  But sending your heroes out to battle and earning cash isn't enough to get through the game: opponents get progressively harder (go figure), and your middle manager must ensure that the superheroes are, well...managed--that is, they receive additional training, morale-boosting, and rest as needed!  So you must distribute finances to effectively expand your Justice Corps facilities and buy new gear for your heroes so they can keep fighting evil for another day.
Snapshot of the Justice Corp branch office screen, showing the various facility
upgrades that can be purchased throughout the game.
 
There are only a few main screens to navigate in the game.  The first one is your Justice Corp branch office, where you assign tasks to your middle manager and superheroes, upgrade facilities, and purchase new items.  Certain rooms are needed at the Justice Corp office pretty early in the game, such as a gym to train up your heroes and a bedroom to get them rested for the next fight; but other facility upgrades can be bought later, such as a lab to research new equipment, or extra cubicles where heroes can do desk work to increase the office profit when they're not out fighting.  All this activity probably doesn't sound really complex, and it's not... until you start juggling the activities of three or four superheroes.  Suddenly all those multi-tasking skills come in handy!  But don't worry, you won't have to deal with paperwork like most middle managers do.  Phew.
 
The second main screen you will navigate is your city status screen, which allows you to view outstanding crime activity--where your heroes can engage in battle--and the level of satisfaction each district has with your crime-fighting activities.  Districts where you dispense justice quickly will be more satisfied, and therefore yield more money for your branch.  You also get more money for responding to potential engagements as quickly as possible.  Each battle icon displays a clock countdown which determines how much experience and money you will get from succeeding in that battle.
 
This is a yak that you can buy for your
office, which dispenses unlimited warm
yak milk for your heroes during battle.
Yum!
The third and final screen is your battle mode screen.  From here, you will manage your heroes during an engagement, provide them with helpful consumable items as needed, and utilize their special powers as available.  It should be noted that you will have the option to "delegate" battles, which allows you to skip the battle mode screen and go about doing other things while your heroes are fighting.  This should only be used if you are fairly confident that your heroes can manage the battle without assistance (you'll get to see a % chance of success when you select your heroes for a given battle),  but the delegation option can be immensely helpful in saving time when you're trying to simultaneously manage activities of a larger group of heroes.


Sample of the battle mode screen with the Masked
Mummy and Captain Premium dispensing justice.

Overall, the interface works well and allows you to move along quickly.  While there is some funny dialogue that I personally enjoyed reading (one plot section involves a displaced Canadian dragon), it's very easy to click through all of that if you just want to get through the game.  I think a player could complete the main game mission with three heroes, so there's not a ton of incentive to recruit more than that. Having more than three makes the game more challenging because you have more people to manage.  I found the various heroes available for recruitment entertaining and wanted to see the different special powers of characters like Surge Protector, @Man, and the Masked Mummy, so I ended up with a total of six heroes by the end of the game.  My play-through inevitably took longer because I was sharing my resources amongst six people, but it was worth it!

This is Sweet Justice, my first hero
recruit. Isn't he cute in his lil' mask?
 
While the main gameplay screens are fairly easy to navigate, later in the game it was somewhat cumbersome to locate, cycle through, and assign tasks to all six of my heroes from the Justice Corp branch office screen.  You can only have four active heroes at any given time, so you have to continually jump to another screen to toggle on/off characters.  Sometimes the swapping-out changes wouldn't take, necessitating repeat attempts to cycle characters.  This can be frustrating when you are trying to move quickly amongst characters to deal with a battle or get them rested up for the next fight.  I think there is probably a better way to integrate this function with the office screen.
 
Overall the game was very engaging, but the mundane "office" tasks (such as sending heroes to rest or boost morale) just became tedious after a while. But you still have to do those tasks to level-up your heroes enough to beat the next bad-guy boss.  There are premium options available that will allow you to move things along faster--you can use real money to buy more superium, which allows you to expedite training of your heroes, recruit more heroes, etc.--so I imagine the theory is that players will pay that money to get through the game faster.  Still, if you want to play MMOJ as a completely free-play game, it's a tolerable level of monotony given the other positive traits of the game.
 
Middle Manger of Justice is a mobile game well worth your time--approximately 10-12 hours of your time, based on my play-through this past holiday weekend.  It encompasses all the little fun details of artistry, dialogue and quirkiness we have come to love and expect from Double Fine Productions.  So get out there and use your thumbs of justice to fight some evil, middle manager!


Friday, August 16, 2013

Book Review: A Shadow in the Flames, Michael G. Munz

I recently had the opportunity to read A Shadow in the Flames, the first novel by Seattle-based sci-fi/fantasy writer Michael G. Munz.  A near-future science fiction adventure/thriller, the story follows a colorful cast of characters whose personalities and backgrounds are slowly revealed and developed throughout the book.  In the run-down city of Northgate we are introduced to Michael Flynn, a young, hopeful, but unemployed man whose only family is a freelancer named Diomedes.  The plot begins to take shape when the apartment shared by Diomedes and Michael burns to the ground, and the two embark on an adventure to determine the cause of the incident.  Munz also introduces a second set of characters conducting excavations on the moon, whose own discoveries are unveiled in chapters interspersed throughout the book.
 
As Diomedes and his new protégé Michael seek out answers about the fire, additional characters enter the picture: Brian, an overly-inquisitive reporter who is a magnet for trouble; Caitlin, a level-headed member of an underground intelligence-gathering organization; Gideon, a morally-conflicted vigilante; and my personal favorite, Felix, an independent information collector who accompanies Diomedes and Michael throughout much of their adventure, adding a dash of dry humor as needed. 
 
A Shadow in the Flames is written in the third person, with the character focus changing each chapter.  This writing style gives the reader a glimpse of the characters' thoughts, motivations, and backgrounds, but not everything is revealed.  At first I found this a bit aggravating, since most of my recent reads were written in the first-person perspective.  However, after more thought, I realized that Munz's choice for perspective is part of the mystery inherent to the story and is consistent with a central theme in the book: that things (and people) are not always what they seem. 
 
While there is certainly a focus on character development throughout the book, it does not overburden the arc of the story; there are plenty of action sequences and entertaining dialogue to keep the energy level high.  Although sometimes interrupted by the injection of the "moon discovery" side-plot, the story still flows well overall, making the book a page-turner. 
 
Munz also has a talent for painting a picture of a mid-21st century Earth that is both plausible and intriguing.  For example, there are several references to cybernetic implants and enhanced artificial limbs which are more advanced than current technology but within the realm of possibility in the next century.  The descriptions of the city of Northgate are bleak and dark, but shamefully decadent, reminiscent of the noir style and urban landscape in Philip K. Dick's novels (to include Do Androids Dream of Electric Sheep? interpreted in the 1982 film Blade Runner).
 
I would be remiss if I did not mention what I consider to be the most endearing quality about Munz's writing style: his own personality and incredible sense of humor shine through in the dialogue and traits of the characters he has created.  One of Felix's lines early in the book is clearly a homage to The Blues Brothers, and it sets the tone for the character's dry wit and clever one-liners for the rest of the book.  It is really a treat to see a writer successfully blend these humorous elements seamlessly with more serious moments to enhance the narrative.
 
As a long-time reader of science fiction, I found A Shadow in the Flames book to be well-written, entertaining, and a great read for anyone who is a fan of the genre.   It is also accessible enough to be enjoyed by a new reader of science fiction, since the story flows well and makes for a quick read.  I would recommend this book as a fun summer read, or to any sci-fi fans looking to get hooked on a new series: after all, this is the first book in a series, The New Aeneid Cycle, with the second one on the way soon....
A MEMORY IN THE BLACK!


Saturday, July 27, 2013

What I learned from San Diego Comic Con 2013


Our crew as Ghostbusters on the last day of SDCC.
Well, I'm back from a month-long hiatus after surviving the nerdnado that was Comic Con 2013.  What an awesome time!  I didn't quite know what to expect since my last time at the Con was seven years ago.  But despite the massive crowds and long lines, the SDCC planners and Convention Center staff did a fantastic job managing everything.  Like many other fans, I really hope that the Con will continue to be held in San Diego in future years.


View of the Convention Center from
the pedestrian bridge.
Prior to the con, there were a ton of articles online about "How to Survive San Diego Comic Con" or "Helpful Tips and Tricks" for first-time Con attendees.   While I personally did not find much of the content to be beneficial, I know that there's a lot of hopeful SDCC attendees looking for some suggestions for next time.  So here's some of my lessons learned--hopefully a few of which won't leave you saying "well, duh" and will save you some heartache during your 2014 preparations. 

1.  Lodging Considerations.  Here's the deal.  It's never too early to plan for next year's Comic Con.  Hotels in Gaslamp will fill up quickly once people have actually secured their tickets, and many people are left scrambling for a place to stay that's not miles away from the Con and costs less than $400-500 a night.  Why not try a vacation rental?  If you are going with a group of 3-4, or can wrangle a group together willing to pool their money, a condo rental is much more cost effective than a hotel.  Try vrbo.com or homeaway.com for listings. 
      Another bonus of a vacation rental is more flexibility than hotel reservations.  We signed a condo rental contract last fall before we knew we had tickets for this year's Con, after noting that most hotels do not allow cancellations for the week of the Con.  However, most landlords of vacation rentals are reasonable enough to include a sublet clause which will allow you to rent to someone else if you don't get tickets.  Better yet, book something now and just plan on coming to San Diego regardless, knowing you'll have MORE than enough to do outside of SDCC even if you don't score tickets to the main event.  Booking something early will save you a headache later on, trust me.


2.  Cosplay Considerations.  I dressed up every single day of the Con, including Preview Night.  While this was incredibly fun and I have no regrets, I didn't fully realize how slow our progress would be getting around the Con while in costume.  Between photographs, chatting with other cosplayers, interviews, and addressing wardrobe malfunctions, we were lucky to get from the Gaslamp into the Exhibit Hall within an hour or two.  This time delay will increase exponentially the better your costume is, or the bigger your boobs are, or the more skin you are showing.  So if you plan to cosplay and are trying to keep a strict schedule (probably unadvisable anyway), allow a LOT of extra time for the frequent stops.  Or, set aside a day that you dress casual and use that as your day to be efficient and just be a spectator.


3.  Who's Who in the (Nerd) Zoo?   I could have probably included this part within cosplay considerations, but my personal experience with this issue made me feel it warranted its own section.  In addition to being familiar with faces of key celebrities, artists, and major players in the comic industry, it might be a good idea to take a look around YouTube and other social media outlets that cover SDCC so you can recognize these folks as they are wandering around for photo ops or doing interviews.  I was interviewed several times and admit that I didn't know who the interviewers were, only to find out upon my return home that they are fairly well-known personalities on YouTube, TV, or podcasts.  I will definitely be brushing up on my media personality knowledge for next year!
A shot of me (as Captain Marvel) being interviewed, later
determined that this was Mediocre Films' Greg Benson.  Oops.
He still put me in his video though--as Moxxi and Captain Marvel!

   A separate but related point on this is: if you are cosplaying, you should know the character whom you are cosplaying.  And not just their name.  I saw a few instances (NOT me!) where folks were interviewed and when asked about the character they were cosplaying, they had nothing to say.  That's just embarrassing, man.  Don't do that to yourself.  Do your research if it's not a character you know well.
 
4.  Connectivity, Twitter, and Communications Limitations.    It was frequently noted before SDCC that cell phone batteries drain quickly and reception is not great within the Convention Center.  That's an understatement.  While Twitter was a great resource to find out about last-minute events, contests, and to keep tabs on the lines for Hall H and Ballroom 20, I gave up trying to tweet and upload photos after Day 1.  It just doesn't work.  I would recommend going to the Con with low expectations as to what social media capabilities you will have, and plan to do all your posting and uploading in the evenings once things calm down a bit.  Batteries will drain fast regardless, so having extra batteries or a power pack are a must-have.

Standing at the end of the
line to get into the Exhibit
Hall on Preview Night.
5.  Preview Night.  We were lucky enough to score the 4-Day with Preview Night tickets.  Based on this year's experience, we will not endeavor to get Preview Night tickets for next year.  If you're a passionate collector of something or have to get an exclusive what-not from a particular vendor, that would be the only motivation to go to Preview Night.  The crowds on the Exhibit Floor on Preview Night were by far the worst of any of the days of the Con, and since we don't really collect anything, it was a fairly miserable experience.  The only other reason to attend Preview Night would be to get in line for the exclusive previews in Ballroom 20, but we did not do this (after being stuck in crowds on the exhibit floor for three hours) so I am unsure if that experience was better.


We had the opportunity to meet and chat
with several Bioware artists and cosplayers
from Mass Effect and Dragon Age.

Our new friends at the Black
Sails ship, who we saw
again later that night at the premiere.
6.  Be Excellent to Each Other, Dude!  I did notice this comment was made in several online postings prior to SDCC, and good for those writers.  Con attendees were extremely decent to each other in general, but it really does pay to go that extra mile to help someone out or just spend a minute talking to some of the vendors about their work.  They are there because they love this stuff too, and on multiple occasions we were treated to some special experiences and/or swag just by showing genuine interest in the work that some of the artists were doing.  We did not spend a ton of time standing in line or camping out for Hall H panels, but I felt that the experiences we had interacting with artists, writers, cosplayers, and other vendors on the Exhibit Floor were extremely rewarding and we did not mind missing out on the popular celebrity panels (although we did make it to the Agents of SHIELD Panel and Preview, which was amazeballs).    


We eventually found time to squeeze in a visit
to the Ender's Game Experience off site.
Worth it! (and I thought this Moxxi shot was
cool)
7.  Outside Comic Con... I thought I'd end on a positive note by confirming that there ARE plenty of things to do outside of the Convention Center itself, so if you are not lucky enough to get tickets to SDCC, I don't think you'd be disappointed.  If you don't believe me, check out the Outside Comic-Con website to see everything that was going on.  I found it a bit challenging to see everything in Gaslamp because we were spending so much time in the convention, and there were many neat things like NerdHQ, Geek and Sundry's HQ, plus any number of promotions for upcoming movies and video games.  Many of the surrounding hotels have agreed to host different pieces of the event in an effort to distribute crowds more evenly, and many of these events don't require an SDCC badge.  That's why I said earlier that it makes a lot of sense to just plan on coming to San Diego for the Con whether or not you have tickets yet....you'll have plenty of nerdy things to do. :)
Adult Swim Funhouse, outside SDCC.
Never before was a superhero (me, as Viper)
so triumphant emerging from the
birthing canal.
Mad Moxxi at the Ender's
Game Experience.


Firefly: "So, think you'll go to Comic Con next year?"
Daredevil:  "I don't know, wearing costumes really isn't my thing.."


So, with all that said, remember:  Being a nerd is awesome!  Structure is fun but be flexible!  And it's never too early to plan for next year. See you in 2014!!


Thursday, June 27, 2013

Returning to Point-and-Click: A Look at Machinarium

I was very excited to find a PlayStation Plus deal for Machinarium, as I had heard great things about this standout indie game by Amanita Design. My weekend was well spent on the game, which is a refreshingly unique, challenging and charming point-and-click adventure designed to appeal to players of all ages. 

The game begins by showing our hero, a little robot, being discarded in the junkyard outside of the city.  The little robot's story is slowly revealed throughout the game in the form of a series of "thought bubbles" that show flashbacks of the robot's past.  These "thought bubbles" are also used to illustrate hints and dialogue with other characters, although there is not actually any dialogue in the strict sense--everything is conveyed through short animations and pictures.


As our robot hero makes his way back to the city to save it and his lady-robot love, he encounters a number of puzzles of varying format and complexity which must be completed to advance the story.  For example, the little robot encounters a problematic gate guard at the drawbridge to enter the city, so you must find a way to trick the guard and get the drawbridge lowered.


Later in the game, there are more complex tasks which require seeking out other robots, completing tasks for them, and in turn using the items they give you to solve another problem. Brain teaser type puzzles are interspersed with scavenger hunt type missions, so you may find yourself facing a game of checkers or a pattern-matching puzzle to move the adventure forward.  Many of the puzzles are quite challenging and require some persistence, but not to the point of being completely discouraging.  I must admit that it took me an embarrassingly long time to beat a robot at checkers.  But what a triumph when I did!


The gameplay is easy enough to learn, since you navigate through the game simply using a cursor with one-click actions to interact with the world.  There are no extra action-wheel menus or shooting/fighting modes to fuss with. The little robot has an inventory pop-up bar at the top of the screen, but it is fairly low maintenance since your robot will discard items once they no longer have a use.  I don't think there were any more than 3-4 items in my inventory at any point.


If you are easily discouraged by puzzles, don't be scared away from giving this game a try: each scene has one freebie hint to help you with the current puzzle, and if you're really in a bind, Amanita provides a complete in-game walkthrough guide. In keeping with the game style, even the walkthrough guide is depicted in comic strip artwork, so be prepared to interpret drawings if you want that extra hint!


Perhaps one of the most memorable aspects of Machinarium is the unique and intriguing artistry used to create this whimsical robot-world in which our hero lives.  There are many cute aspects to the characters and their mannerisms, but there is also a distinct melancholy and industrial feel to the whole world.  It was truly compelling and left me wanting to see more content, since the game is fairly short (though well done and satisfying in its own right).


Earlier I alluded to the fact that there's no shooting or fighting in the game.  In fact, there's not any violence in the game and your robot hero is simply regenerated if you do something harmful to him.  For that reason, this game is suitable as a family title to engage younger gamers but still challenging enough for adults....not to mention, it's a somewhat refreshing shift from the mainstream big-dog FPSs and RPGs on the market.


I really cannot find fault with Machinarium, other than the occasional tedium of trying to find the actionable items in the environment, but this is a flaw intrinsic to point-and-click adventures.  Overall, Machinarium is a solid choice for gamers of all ages, a good workout for the brain and a fun feast for the eyes.  I hope that we'll be seeing more good things from Amanita on the next gen consoles.


Sunday, June 16, 2013

Getting in Shape for Comic Con, Part 3: Crunch Time for Costumes


Since today marks the 1-month countdown for our trip out to San Diego Comic Con, I thought it an appropriate time to provide an update on our progress.  So here goes...

Captain Marvel.  Done and DONE!  I put the finishing touches on the accessories yesterday and did a trial run of everything this weekend.  It's looking great!  I thought this could be my one preview costume prior to the event since the other two are still in progress, so I've included some photos here.  I really need to work on staying in character in being serious...kept cracking up the whole time!


 Madame Hydra/Viper.  What can I say, the spandex is at the tailor.  I have the boots and holster ready, but the main feature of my costume will be her back tattoo (pictured below).

If anyone has any tips on the best method for doing a large (5x5") temp tattoo that won't rub off for a few days, let me know.  I'd really rather not use that much permanent marker on my back and, moreover, do not trust my husband or brothers to doodle with marker on my back.


Spats in progress, made from white leg
warmers...I learned to sew buttons!!
Mad Moxxi.  Almost complete!!  Here's some photos of the latest accessories to be finished up.  In keeping with my budget-savvy tendencies, I bought some $5 leg warmers on Amazon which I crafted into spats.  I also made Moxxi's belt buckle with some cheap items from the craft store and a little bit of painting skills.   Still fixing buttons on the jacket, but otherwise ready to go.
Moxxi spats, hat, and belt buckle, all handmade.


One of three versions of Wolverine that Jon will cosplay
at SDCC.
Wolverine.  Jon's cosplay is still coming along, but I think he has the beard part handled...
No beard? No problem!
Grown in three weeks.
Most recently I have been working on Wolverine's blades, which I finished up today. I used some sturdy foam board which I painted silver, and are secured together with aluminum wire.  I molded them to fit his hands and wrapped the aluminum wire with floral wire for comfort and extra support.  They're not retractable or anything high-speed, but easy to don and doff and I think they look realistic enough!
Step 1, cutting the blades
out of foam board


Step 2, threading aluminum wire
through the foam blades

Step 3, molding wire and covering
in floral wire.
Step 4, painting foam blades
and floral wire. Done!


That's a wrap on the costume update...coming soon on Getting in Shape for Comic Con: our adventures in juice cleanses from Khepra's and some more previews of our cosplays!   Plus a Comic-Con warm up at Annapolis Comic Con later this month!