 |
| Full-length view of Handsome Jack |
My blog post from this past April, Bioshock on a Budget, focused on assembling a cosplay for under $50. The article was so well-received that I recently decided to do a follow-on project. This time I chose Handsome Jack, a character from one of my other favorite games, Borderlands. I thought this cosplay would be a great fit for my husband to accompany my Mad Moxxi cosplay, in anticipation of Baltimore Comic Con last weekend. And, looking at the elements of Handsome Jack's outfit, I thought it would be realistic for me to put together the cosplay for under $50. Was I successful? Read on to find out!
 |
| This close-up screen shot of Handsome Jack shows the facial detail and several of the accessories I would need to construct to make an accurate cosplay. |
For those unfamiliar with the character Handsome Jack from Borderlands, he's the bad guy. In fact, he's the biggest jerk in all of Pandora. That being said, his look is pretty awesome and distinctive enough to make a great cosplay. It also has a lot of elements that I thought I could realistically find at the thrift store and modify for the cosplay--much like my Elizabeth and Booker cosplays from Bioshock Infinite. The main structural elements of Handsome Jack's outfit are a gray blazer, white collared shirt, orange crew-neck shirt, and dark pants with sneakers. But you can see from the photos that there's a lot of small accessories, including the digital "mask" pieces on his artificial face. So really, the devil is in the details on this one, and I spent a majority of my time working on those details to make a convincing cosplay.
Knowing that the accessories would be the biggest time sink, I started with those. Most supplies I needed came from the local crafts store (Michael's) and items were primarily constructed of foam board or balsa wood. Both materials are fairly easy to work with (scissors for foam, exacto knife for balsa wood) so you don't need a ton a crafty skills to do this.
 |
| This is the wood facing glued on the face of a standard silver belt buckle. The wood was later painted silver. |
 |
| The start of the belt buckle, a 2x3 flat wood piece with details made from fancy construction paper and some fabric-coated wire. |
First I made the belt buckle and Jack's aqua-colored light array on his lapel. I used a 2x3" flat wood piece from Michaels (sold as a set of 5 for $1.99) and glued it onto a standard silver belt buckle. for the front details, I cut a small circle out of some sparkly aqua-colored paper and glued it to the wood. I used a small piece of fabric-covered wire around the edge of the paper to give it a more finished look.
For Jack's lapel light array, I used balsa wood. I traced a hexagonal shape onto the wood, and carved it out using an Exacto knife. Then I just used some regular sand paper to smooth out the edges. Later, this wood shape was painted with silver acrylic paint and the circular center was painted with an aqua-colored paint. I added in the line details with a slightly darker color paint.
 |
| The start of the light array on Handsome Jack's lapel, carved out of balsa wood with an Exacto knife. I traced the shape outline on the wood with pencil before cutting, then sanded down the edges after cutting. |
 |
The foam board pieces that would
eventually be used as Jack's digital
facial pieces. I painted them with
silver paint and added acqua paint
for accents to give it a more digital
look, and used dark grey to add
details that mimicked metal hinges
and screws.
|
For the facial attachments to create the basis of Jack's "mask," I cut out foam board pieces, glued them together and painted to resemble small electronic components. These are lightweight enough to be attached to the cosplayer's face using eyelash adhesive.
 |
| Here's what the necklace looked like once buttons were strung and painted. |
Jack's necklace was a bit tricky as I needed to inexpensively construct something with square, metallic-looking pieces, but could not find any right-shaped beads or jewelry at the craft store. I ended up buying a cheap bag of nean-colored square buttons, and painting them dark gray/silver. I then used some plastic stretch cord to connect the buttons. It wasn't the sturdiest construction ever, but it got the job done!
Next, I did a few little detail items for Jack's blazer: a patch on the right sleeve (which you can see in the screen shot above) and some other electronic component pieces for the shoulder boards on the blazer. I just used bright orange paint on a scrap piece of brown fabric from another project, and later sewed the patch on the blazer. For the shoulder boards, I crafted the electronic component pieces the same way I made the previously mentioned facial "mask" pieces...silver and aqua paint on foam board.
 |
| Miscellaneous accessory components in varying stages of completion (clockwise from bottom left): Neon buttons used for necklace; balsa wood aqua light array on lapel; electronic components for blazer and facial attachments; plastic buckles for vest; arm cuffs; and decorative arm patch for blazer (center). |
 |
| Here's the brown leather vest (already in our wardrobe) with plastic buckles attached to buttons using clear stretch cord, pictured left. |
And finally: the actual clothing. I found a gray suit jacket at the thrift store for $8.99. As cost-saving measures, I decided to just use jeans for the pants and a pair of existent brown loafers for the shoes. We were lucky to have a brown vest already in our wardrobe (see my comments at bottom about work-arounds for this). I also found an orange tee at the thrift store, and some white sheet fabric to make the shirt tail that extends below Jack's blazer. Both of those cost a total of $5.50. I had some leftover gray fabric from another project which I used to make a couple embellishment straps on the blazer, and used some of those leftover orange buttons from the craft store to decorate the straps. I made the shirt tail as an attachable piece for the back of the blazer.
 |
| The finished shirt tail, made of a white sheet bought at thrift store. |
Now I have to admit that since I did my Bioshock on a Budget blog entry in April, I have learned to sew...not well, but good enough to follow some basic patterns and modify pre-made clothing. So for Jack's white shirt tail, I cut a whale tail shaped piece of fabric, finished the edges with the sewing machine, and pinned the fabric to the blazer. Sounds pretty easy but it took a lot longer than expected...I was sewing like the wind the night before Baltimore Comic Con!
So Friday night I put everything together, and Saturday morning was spent doing the facial makeup for Handsome Jack. I used eyelash adhesive for the electronic components, and some light-tone liquid makeup outlined by a brown eyeliner pencil to create the illusion of a mask. I also made the eyebrows more pointed using the eye pencil. And there you have it!

Breaking down all the supplies and costs, let's see how we did:
Foam Board $1.99
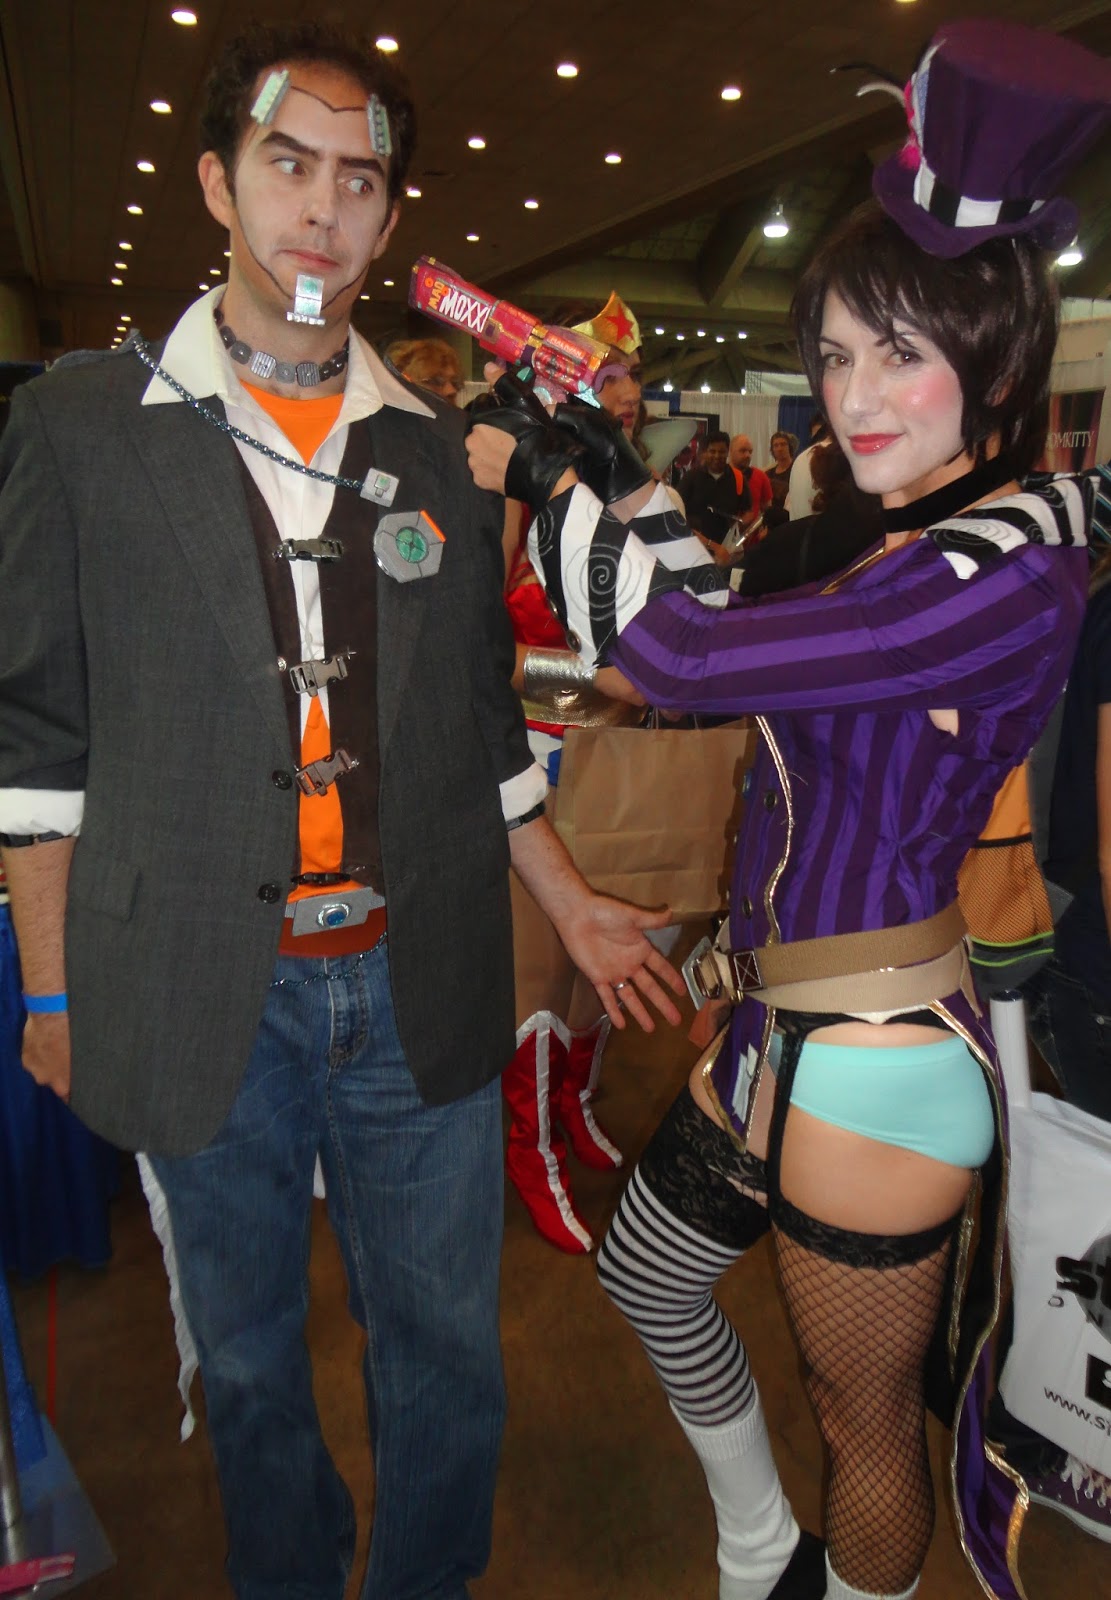 |
| Me as Mad Moxxi and Jon as Handsome Jack at Baltimore Comic Con 2013. |
Balsa Wood $3.99
2x3" flat wooden pieces $1.99
Aqua-colored art paper $1.99
Clear stretch cord $2.99
Bag of plastic buttons $1.99
Craft glue $2.49
Plastic buckles (6) $2.99
Plastic bracelets $6.00
Metal belt buckle $0.99
Acrylic Paints (4 used in this project) $4.00
Gray suit jacket $8.99
White fabric for shirt tail $2.99
Orange tee shirt $2.50
Leather scrap fabric $5.99
Exacto knife $5.99
TOTAL $57.87
So not quite under $50, but pretty close! I must mention that many of the items above were actually purchased for previous craft projects (Exacto knife, craft glue, paints, scrap fabric) and really are multiple use items...so technically I could have omitted them from the shopping list and I would have been under the $50 budget. But one other caveat is that I did NOT include the brown leather vest in my cost totals, because it was in my husband's wardrobe already and I have no idea how much it cost. That being said, I priced some similar-looking orange-brown fabric at the fabric store which was $4.99/yd, so you could conceivably make something for under $10. Alternatively, you could get lucky and find a vest at the thrift store. Even if the color is inaccurate, you could paint the vest or pin some right-colored fabric over the front. This would be the least expensive option but could potentially require a bit more time to find and/or craft.
I hope you enjoyed this edition of the Budget Cosplay series! Feel free to comment below if you have questions or feedback.

No comments:
Post a Comment